AC•THOR / AC ELWA 2
1. Basic settings on the my-PV device
First read the installation and user manual supplied with the device, as well as the online manual.
- The user manual for AC•THOR can be found here
- The user manual for AC ELWA 2 can be found here
- Make sure the device is correctly installed and connected before proceeding.
2. Settings on the my-PV device
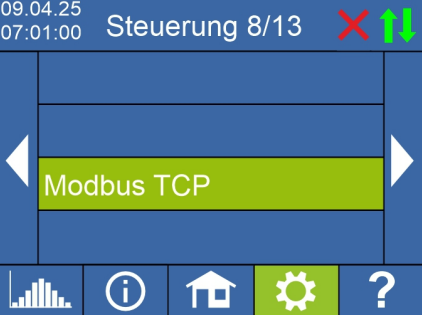
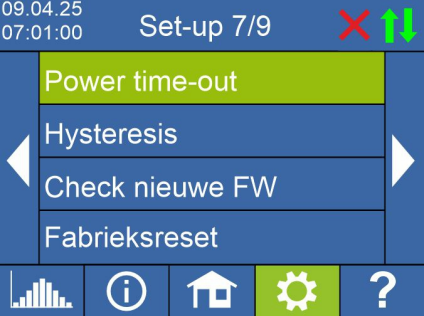
Configure the following parameters in the web interface or via my-PV Cloud:
| Setting | Value / Comment |
|---|---|
| Control source | Modbus TCP |
| Power time-out | 60 seconds |
These settings can be applied directly on the device, via the web interface, or through my-PV Cloud.
3. Network & communication
- The AC•THOR or AC ELWA 2 devices are connected to SmartgridOne Controller through your local network (router).
- Within this network, the my-PV device receives commands indicating how much power it should deliver.
Important
Notes & Limitations
- A maximum of 10 my-PV devices can be controlled within a single network.
- The operating mode M3 is not supported in this configuration.
- Do not connect the my-PV device directly to the inverter or battery system — control must occur via the network.
4. Settings on SmartgridOne Controller
Perform the following steps in the web interface of SmartgridOne Controller:
Step 1: Select the device type
You will be asked: "What kind of device do you want to add?"
Step 2: Select the manufacturer
Choose MYPV from the list of manufacturers.
Step 3: Select the model
You will be asked: "Which device model are you adding?"
Select the correct model, for example:
- AC Elwa 2
- Acthor
- Acthor 9s
Step 4 & 5: Network & communication
SmartgridOne Controller will perform a network scan. In the "Device network parameters" screen, you can add the device:
- Option 1: Add by MAC address (recommended for networks with DHCP)
- Option 2: Add by fixed IP address, domain, or hostname
Step 6: Configure the device settings
In the "Device/group settings" screen, configure the specific settings for the my-PV device.
| Setting | Example value | Comment |
|---|---|---|
| Is the device single or three phase? | Single phase | Select the correct phase configuration |
| Normal power (W) | [device-specific] | Nominal power of the my-PV device |
| Operating voltage | Same as the main device | Operating voltage |
| Normal voltage type | Phase-neutral | Select voltage type (Phase-neutral or Phase-phase) |
| Normal voltage (V) | 2300 | Nominal voltage in Volts (e.g. 230V × 10) |
Don’t forget to click the Save button at the bottom of the page.